- Expo React Native 앱에 푸시 알림 적용하기: 성공적인 통합 가이드2025년 07월 14일 17시 59분 02초에 업로드 된 글입니다.작성자: DandyNow728x90반응형
Expo React Native 앱에 푸시 알림 적용하기: 성공적인 통합 가이드
React Native와 Expo를 사용하면 복잡한 네이티브 설정 없이 간편하게 푸시 알림 기능을 앱에 추가할 수 있다. Expo의 푸시 알림 서비스는 Apple Push Notification service (APNs)와 Firebase Cloud Messaging (FCM) 사이의 복잡한 과정을 추상화하여 개발자가 쉽게 알림을 보낼 수 있도록 지원한다.
푸시 알림을 적용하기 위해서는 실제 단말기가 필요한데, 나의 경우 우선적으로 Android 단말기를 이용한 테스트를 진행해 보았다. 푸시 알림 기능은 빌드된 상태에서 동작한다. 따라서 EAS (Expo Application Services)에 로그인한 상태에서 빌드를 진행해야 한다. 빌드 관리는 https://expo.dev/ 에서 확인 가능하며, 큐알 코드를 이용해서 빌드 파일을 실제 단말기로 다운로드 받을 수 있다. Android의 경우 빌드전에
google-services.json가 준비되어 있어야 한다. 해당 파일은 구글의 FCM 설정을 통해 얻을 수 있으므로 구글 계정이 필수다.푸시 알림 서비스 적용은 Expo에서 관련 라이브러리와 SDK를 제공하고 있어 어렵지 않다. 하지만 코드단이 아닌 인프라 관련 여러 설정들을 해줘야 해서 번거로움이 있다. Expo 문서에서 소개하고 있는 아래의 유튜브 영상을 참조하면 이 부분에 대한 도움을 받을 수 있을 것이다.
Expo Notifications with EAS | Complete Guide (https://www.youtube.com/watch?v=BCCjGtKtBjE)
이 포스팅에서는 프로젝트 생성 방법을 소개한 후, Expo 공식 문서를 토대로 작성한 튜터리얼을 제공하려고 한다. 또한 리액트 훅을 이용한 코드를 추가로 소개하고, 그 밖의 유용한 팁도 정리해 보고자 한다.
1. 새로운 프로젝트 생성 및 실행 방법
새로운 프로젝트를 생성한다. 옵션으로 기본 템플릿은 사용하지 않고(
--template blank) 타입스크립트는 사용하는 것(-typescript)으로 적용했다.npx create-expo-app YourProjectName --template blank-typescript프로젝트 실행 명령어는 다음과 같다.
-c는 실행할때 기존 캐시를 삭제하는 옵션이다.npx expo start -c2. 푸시 알림 튜터리얼
오른쪽의 링크를 참조하자! (https://postforty.tistory.com/627)
3. 리액트 훅을 이용한 코드 예시
푸시 알림 기능의 핵심은
expo-notifications및expo-device라이브러리를 활용하는 것이다. 먼저 이 두 라이브러리를 프로젝트에 설치해야 한다.hook/usePushNotifications.ts라는 커스텀 훅을 생성하여 푸시 알림 관련 로직을 캡슐화하는 것이 권장된다. 이 훅은 다음과 같은 주요 기능을 수행한다.- 기기 확인:
expo-device를 사용하여 앱이 실제 기기에서 실행 중인지 확인한다. 푸시 알림은 에뮬레이터나 시뮬레이터에서 테스트할 수 없기 때문이다. - 권한 요청:
Notifications.getPermissionsAsync()및Notifications.requestPermissionsAsync()를 통해 사용자에게 푸시 알림 권한을 요청한다. - Expo 푸시 토큰 발급:
Notifications.getExpoPushTokenAsync()를 호출하여 기기에 대한 고유한 Expo 푸시 토큰을 발급받는다. 이 토큰은 알림을 특정 기기로 전송하는 데 사용된다. - 안드로이드 채널 설정: 안드로이드의 경우, 알림 채널을 설정하여 알림의 중요도, 진동 패턴, 색상 등을 제어할 수 있다.
- 알림 리스너 설정:
Notifications.addNotificationReceivedListener는 앱이 포그라운드 상태일 때 알림을 수신하는 데 사용되며,Notifications.addNotificationResponseReceivedListener는 사용자가 알림과 상호 작용했을 때(예: 알림 탭) 발생하는 이벤트를 처리한다.
생성된
usePushNotifications훅은App.js와 같은 메인 컴포넌트에 적용된다. 훅에서 반환되는expoPushToken과notification상태를 활용하여 알림 토큰을 화면에 표시하거나, 수신된 알림의 제목과 본문을 UI에 렌더링할 수 있다.hook/usePushNotifications.ts(핵심 로직):import { useState, useEffect, useRef } from 'react'; import { Platform } from 'react-native'; import * as Device from 'expo-device'; import * as Notifications from 'expo-notifications'; import Constants from 'expo-constants'; Notifications.setNotificationHandler({ handleNotification: async () => ({ shouldShowAlert: true, shouldPlaySound: true, shouldSetBadge: true, shouldShowBanner: true, shouldShowList: true, }), }); export interface PushNotificationState { expoPushToken?: Notifications.ExpoPushToken; notification?: Notifications.Notification; } export const usePushNotifications = (): PushNotificationState => { const [expoPushToken, setExpoPushToken] = useState<Notifications.ExpoPushToken | undefined>(); const [notification, setNotification] = useState<Notifications.Notification | undefined>(); const notificationListener = useRef<Notifications.Subscription | null>(null); const responseListener = useRef<Notifications.Subscription | null>(null); async function registerForPushNotificationsAsync() { let token; if (!Device.isDevice) { alert('푸시 알림은 실제 기기에서만 테스트할 수 있습니다.'); return; } const { status: existingStatus } = await Notifications.getPermissionsAsync(); let finalStatus = existingStatus; if (existingStatus !== 'granted') { const { status } = await Notifications.requestPermissionsAsync(); finalStatus = status; } if (finalStatus !== 'granted') { alert('푸시 알림 권한을 얻는 데 실패했습니다.'); return; } try { const projectId = Constants.expoConfig?.extra?.eas?.projectId; if (!projectId) { throw new Error('프로젝트 ID를 찾을 수 없습니다. app.json에 설정해주세요.'); } token = await Notifications.getExpoPushTokenAsync({ projectId, }); } catch (e) { console.error(e); } if (Platform.OS === 'android') { await Notifications.setNotificationChannelAsync('default', { name: 'default', importance: Notifications.AndroidImportance.MAX, vibrationPattern: [0, 250, 250, 250], lightColor: '#FF231F7C', }); } return token; } useEffect(() => { registerForPushNotificationsAsync().then(token => { setExpoPushToken(token); }); notificationListener.current = Notifications.addNotificationReceivedListener(notification => { setNotification(notification); }); responseListener.current = Notifications.addNotificationResponseReceivedListener(response => { console.log('Notification Response:', response); }); return () => { if (notificationListener.current) { Notifications.removeNotificationSubscription(notificationListener.current); } if (responseListener.current) { Notifications.removeNotificationSubscription(responseListener.current); } }; }, []); return { expoPushToken, notification, }; };App.tsx(훅 사용 및 UI):import { StatusBar } from 'expo-status-bar'; import { StyleSheet, Text, View } from 'react-native'; import { usePushNotifications } from './hook/usePushNotifications'; export default function App() { const { expoPushToken, notification } = usePushNotifications(); console.log(expoPushToken) return ( <View style={styles.container}> <Text>Open up App.js to start working on your app!!!!!</Text> <Text>Expo Push Token: {expoPushToken?.data}</Text> {notification && ( <View> <Text>Notification Title: {notification.request.content.title}</Text> <Text>Notification Body: {notification.request.content.body}</Text> </View> )} <StatusBar style="auto" /> </View> ); } const styles = StyleSheet.create({ container: { flex: 1, backgroundColor: '#fff', alignItems: 'center', justifyContent: 'center', }, });주요 종속성 (
package.json):푸시 알림 기능에 필요한 주요 종속성들은 다음과 같다.
expo-device: 기기 정보를 확인하는 데 사용된다.expo-notifications: 푸시 알림을 처리하는 핵심 라이브러리이다.expo-constants:projectId와 같은 Expo 관련 상수를 가져오는 데 사용된다.expo-dev-client: 개발 빌드에서 딥 링크 및 기타 개발자 기능을 활성화하는 데 필수적인 패키지이다.
4. 주의 사항
푸시 알림 기능을 성공적으로 구현하고 테스트하기 위해 다음과 같은 주의 사항을 반드시 숙지해야 한다.
- 실제 기기 테스트: 푸시 알림은 에뮬레이터나 시뮬레이터가 아닌 실제 물리적 기기에서만 테스트할 수 있다. 개발 빌드를 생성한 후, 해당 빌드를 [그림 1]의 큐알 코드를 이용하여 실제 기기에 설치해야 한다.
- 개발 빌드 사용: Expo Go는 최신 SDK 버전에서 푸시 알림 기능을 지원하지 않으므로, 푸시 알림을 사용하려면 반드시
eas build를 통해 생성된 개발 빌드를 사용해야 한다. - 개발 서버 연결: 개발 빌드를 기기에 설치한 후,
npx expo start --dev-client명령으로 로컬 개발 서버를 시작하여 앱이 이 서버에 연결되도록 해야 한다. 이를 통해 코드 변경 사항이 실시간으로 반영되고 디버깅이 가능해진다. - 환경 변수 관리: 푸시 알림 서비스 엔드포인트와 같은 민감한 정보나 URL은
.env파일에 저장하여 GitHub와 같은 버전 관리 시스템에 커밋되지 않도록 관리하는 것이 권장된다.

[그림 1] 빌드된 apk 파일 다운로드용 큐알코드(가입된 expo 계정으로 로그인 요망) 5. 푸시 알림 테스트
백엔드 서버 없이 [그림 2]와 같은 https://expo.dev/notifications에서 테스트 해볼 수 있다.
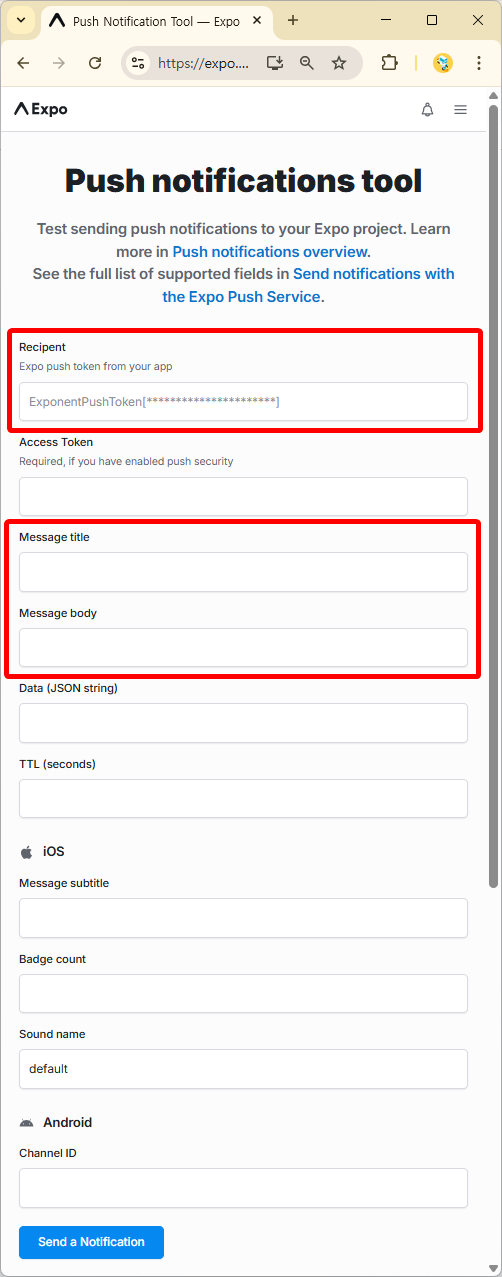
[그림 2] 붉은색 표시된 인풋창에 입력 후 알림 보내기 버튼 클릭! 728x90반응형'언어·프레임워크 > React Native' 카테고리의 다른 글
[React Native] 모바일 웹뷰의 vh 단위와 가상 키보드: 동적 뷰포트로 인한 레이아웃 문제와 injectedJavaScript 해결책 (1) 2025.07.16 [React Native] npx expo start --dev-client -c 명령어: Expo 개발 환경을 위한 강력한 조합 (1) 2025.07.15 [Ract Native] Expo에서 SQLite 연동하는 최신 방법 (0) 2025.03.22 [React Native] 카카오맵 연동을 위한 webview 설치, React 개발자 도구 사용 (0) 2024.05.23 [React Native] 크립토 앱 튜토리얼 (0) 2024.05.13 이전글이 없습니다.댓글 - 기기 확인: