방명록
- [Node.js] API 서버에 api-key 적용 및 Swagger 문서화2024년 01월 25일 16시 52분 50초에 업로드 된 글입니다.작성자: DandyNow728x90반응형
1. uuid-apikey 라이브러리
uuid-apikey 라이브러리(https://www.npmjs.com/package/uuid-apikey)를 이용해서 apikey, uuid를 생성하고 API 요청 시 유효한지 검증할 수 있다. 설치 방법은 아래와 같다.
npm install uuid-apikey
2. uuid-apikey 적용
// app.js

// (생략)

// API키 생성
import uuidAPIKey from "uuid-apikey";
console.log(uuidAPIKey.create()); // 터미널에 객체 자료형으로 apiKey, uuid가 찍힌다. 새로운 키를 생성할 필요가 없을 때는 주석 처리한다.

// (생략)
// app.js // (생략) // key 변수를 app.js가 아닌 routes/v1_promo.js에서 사용할 것이기 때문에 export함 export const key = { apiKey: "(생략)", uuid: "(생략)", }; // (생략)3. API 키 검증 및 Swagger 문서화
// routes/v1_promo.js

import express from "express";
const router = express.Router();
import { queryPromo } from "../mysql/index.js";
import uuidAPIKey from "uuid-apikey"; // 추가
import { key } from "../app.js"; // 추가

// console.log(key) // 여기에서 호출하면 undefined. router.get() 메서드 내에서 호출해야 함

// #swagger.security를 추가해 주었다.
router.get("/promo-list", async (req, res) => {
  /*
    #swagger.tags = ['홍보 관련']
    #swagger.summary = '홍보 리스트 조회'
    #swagger.description = 'Client에서 홍보리스트를 요청하고, Server는 홍보리스트를 응답한다.'
    #swagger.path = "/promo/promo-list"
    #swagger.security = [{
            "apiKeyAuth": []
    }]
  */
  try {
    // API 요청시 API 키를 header에 넣어 받도록 했다.
    let apikey = req.headers["api-key"];

    // API 키를 검증하는 코드를 추가하였다.
    if (
      !apikey ||
      !uuidAPIKey.isAPIKey(apikey) ||
      !uuidAPIKey.check(apikey, key.uuid)
    ) {
      res.status(401).send("API KEY가 유효하지 않습니다.");
    } else {
      const result = await queryPromo("promotions");
      res.send(result);
    }
  } catch (e) {
    res.status(400).send("유효하지 않은 요청입니다.");
  }
});

export { router };
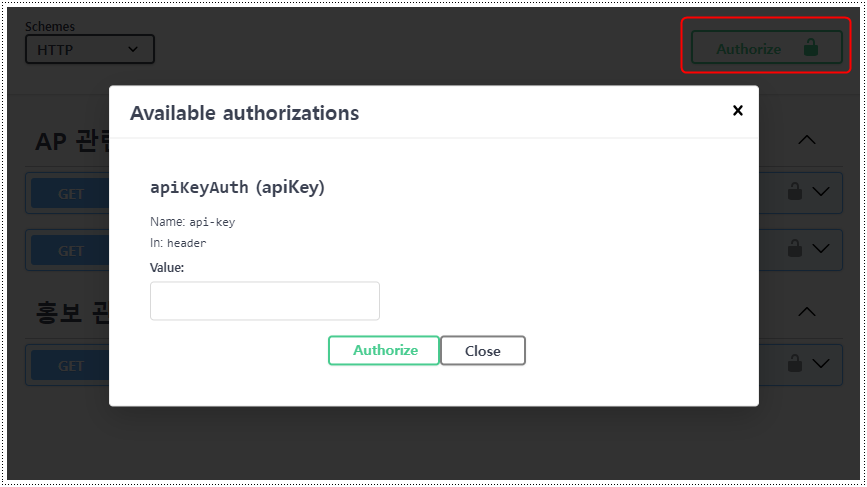
// swagger.js import swaggerAutogen from "swagger-autogen"; import * as dotenv from "dotenv"; dotenv.config(); const doc = { info: { title: "(생략)", description: "(생략)", }, host: "localhost:3000", basePath: `/api/${process.env.ROUTE_VERSION}`, // securityDefinitions을 추가해야 한다. securityDefinitions: { apiKeyAuth: { type: "apiKey", in: "header", name: "api-key", }, }, }; const outputFile = "./swagger-output.json"; const endpointsFiles = ["../app.js"]; const routes = ["./routes/v1_promo.js"]; swaggerAutogen(outputFile, routes, doc, endpointsFiles);위의 과정을 마치면 Swagger UI에서 API 키를 입력하는 [그림 1]과 같은 모달을 볼 수 있다. 모달은 "Authorize" 버튼을 클릭하면 된다. 개별 API에서도 API 키를 입력받는 input 창을 볼 수 있다. Available authorizations 모달에서 키를 한 번만 입력하면 개별 API에서 키를 입력할 필요 없이 모든 API 호출 테스트가 가능하다.

[그림 1] Swagger UI에서 API 키를 입력 받을 수 있는 모달이 뜬다. 728x90반응형'언어·프레임워크 > Node.js' 카테고리의 다른 글
[Node.js][TROUBLESHOOTING] 객체에 엉뚱한 속성이??? (0) 2024.04.19 [Node.js] MySQL 날짜, 시간이 왜 UTC 시간으로 조회될까? (0) 2024.01.29 [Node.js] Swagger을 이용한 API 문서 생성 (0) 2024.01.24 [Node.js][Trouble Shooting] sqlMessage: "Access denied for user 'root'@'localhost' (using password: NO)" (0) 2022.10.08 [Node.js] [문제해결] Vue.js에서 마이크로소프트 액세스 mdb 파일을 읽어 오려다가... SyntaxError (0) 2022.05.25 다음글이 없습니다.이전글이 없습니다.댓글